Nova Zelanda ha ‘eliminat efectivament’ el coronavirus. Això és el que van fer bé.
Respon

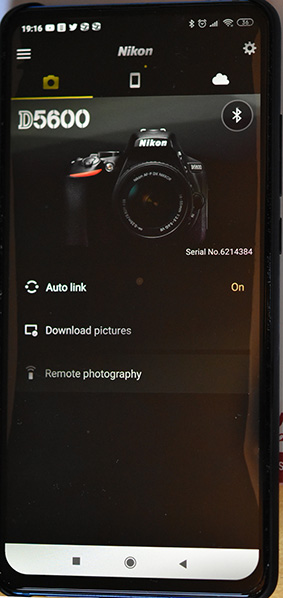
Si ja has usat anteriorment la connexió i tens problemes per enllaçar la càmera amb el mòbil. proba de desinstal·lar completament snapbridge i tornar-lo a instal·lar seguint les instruccions que l’APP et va donant.
Aquest comentari d’internet és el que m’ha funcionat millor:
Bluetooth isn’t setup directly from the menu on the d5600 and other SnapBridge enabled cameras. Instead, you have to use the WiFi or NFC linkage from the SnapBridge app to get your phone or tablet to pair with your camera on Bluetooth.
You can view or download the pairing guides and manuals (pdf) for the d5600 at this location: Nikon D5600 Download Center
I’ve only gone through this process with an iOS device and a D500, but here are the basics and the guides at the aforementioned link have the same steps:
Note that if your camera battery is not at 85% or better charge, you may have trouble connecting to the WiFi AP/network hosted by the camera. This is mentioned in the docs but worth repeating because out-of-the-box or after even moderate camera use, the camera’s battery will not be fully charged and you will have to wait for a full charge to setup Bluetooth/Snapbridge. I carry an extra battery with me in the field if I anticipate needing to use SnapBridge.
Last, I had one more quirk that I couldn’t duplicate, but just in case: If you setup a WiFi access password on the camera containing a space or an underscore, you might not be able to connect to it from your phone or tablet. I wasn’t able to duplicate this issue again after the 1.06 patch for the D500, but if you’ve done the same, it may be worth trying a new password for WiFi that only has alphanumeric characters.
En aquest exemple veurem com passar paràmetres entre dos programes PHP: prog1.php –paràmetre –> prog2.php (admin.php) ubicats al mateix servidor.
[php]
<form class="form" method="post" name="f1" >
<input name="admin" type="button" id="idex_admin" style="display: yes" value="admin"
onclick=’document.f1.action="admin.php";document.f1.submit();’/>
<input name="admin" />
[/php]
Aquí tenim un exemple de menús tipus TINYdropdown veurem que no es possible passar paràmetres quant un d’aquests fa referencia a un programa diferent. El mètode que detallo aquí l’he utilitzat molt fent el software del «POLIDICCCIONARI». Si escrivim qualsevol cosa a la casella admin, veurem que si la volem passar al modul «admin» nomes ho posem fer amb «HTML» amb $_POST[admin].
El que si que permet TINYdropdown es simular que prem el boto «admin» amb una bunció javascript:
[php]
a onclick=’admin()’ href=’javascript:void(0); ‘> admin
[/php]
I la funció javascript es:
[php]
function admin(){
//alert ("boto go_admin");
document.getElementById("idex_go_admin").click();
}
[/php]
Finalment el codi de «top_menu.php» es
[php]
<!DOCTYPE html PUBLIC "-//W3C//DTD XHTML 1.0 Transitional//EN" "http://www.w3.org/TR/xhtml1/DTD/xhtml1-transitional.dtd">
<html xmlns="http://www.w3.org/1999/xhtml">
<head>
<meta http-equiv="Content-Type" content="text/html; charset=UTF-8"/>
<meta name="viewport" content="width=device-width, initial-scale=1" />
<title>TinyDropdown 2 – animated javascript dropdown</title>
<link rel="stylesheet" href="tinydropdown.css" type="text/css" />
<script type="text/javascript" src="default.js"></script>
<div class="nav">
<p class="title">
<img src="cat.png" style="float:right; margin: 0 20px;" alt="FAS logo" />Gramàtica Catalana
<form class="form" method="post" name="f1" >
<input name="admin" type="button" id="idex_admin" style="display: yes" value="admin"
onclick=’document.f1.action="admin.php";document.f1.submit();’/>
<input name="admin" />
</p>
<ul id="menu" class="menu">
<li><a href="#" title="Fonètica i ortografia" target="_top">Inici</a>
<ul>
<li><a href="#" target="_top">Inici</a></li>
<li><a href="#" target="_top">contactar</a></li>
</ul>
<li><a href="#" title="Fonètica i ortografia" target="_top">Fonètica i ortografia</a>
<ul>
<li><a href="#" title="Vocalisme: fonètica" target="_top">Vocalisme: fonètica</a></li>
<li><a href="#"title="Vocalisme: A/E " target="_top">Vocalisme: A/E </a></li>
<li><a href="#"title="Vocalisme: O/U " target="_top">Vocalisme: O/U </a></li>
<li><a href="#"title="Separació de síl·labes " target="_top">Separació de síl·labes </a></li>
<li><a href="#"title="Accents i dièresi" target="_top">Accents i dièresi </a></li>
<li><a href="#"title="Archived photo portfolio" target="_top">- regles d’accentuació</a></li>
</ul>
<li><a href="#" title="Current work for sale" target="_top">Morfologia i sintaxi</a>
<ul>
<li><a href="#" title="Recent work for sale" target="_top">Lèxic</a></li>
<li><a href="#"title="Archived photo portfolio" target="_top">Gènere: casos especials</a></li>
<li><a href="#"title="Archived photo portfolio" target="_top">Nombre: casos especials</a></li>
<li><a href="#"title="Archived photo portfolio" target="_top">adjectiu</a></li>
<li><a href="#"title="Archived photo portfolio" target="_top">Q o C</a></li>
<li><a href="#"title="Archived photo portfolio" target="_top">Article apòstrof i contracció</a></li>
</ul>
<li><a href="#" title="Current work for sale" target="_top">lèxic i expressió</a>
<ul>
<li><a href="#" title="Recent work for sale" target="_top">Lèxic</a></li>
<li><a href="#"title="puntuació: ús de la coma" target="_top">puntuació: ús de la coma</a></li>
<li><a href="#"title="La descripció" target="_top">La descripció</a></li>
<li><a href="#"title="guió per parlar d’una novel·la" target="_top">guió per parlar d’una novel·la</a></li>
<li><a href="#"title="text argumentatiu" target="_top">text argumentatiu</a></li>
<li><a href="#"title="Article d’opinió" target="_top">Article d’opinió</a></li>
</ul>
</li>
<li class="nodiv"><a onclick=’admin()’ href=’javascript:void(0); ‘> Admin </a>
</li>
</ul>
<script type="text/javascript">
var dropdown=new TINY.dropdown.init("dropdown", {id:’menu’, active:’menuhover’});
</script>
</head>
<body>
</body>
</html>
[/php]
i el CSS
[php]
* {margin:0; padding:0; outline:0}
/* menu bar background and text */
.nav {
height:100%;
min-height:500px;
width:100%;
padding: 5px 10px 5px 10px;
background:url(images/verd_claret.gif);
/*background-color:#BDB9C3;*/
color:#4D4959;
text-shadow:0px 0px #888;
z-index:100;
}
.nowrap {
white-space: nowrap ; /* mateixa linia*/
}
/* link */
.menu a {float:left; color:#4D4959; text-decoration:none; width:130px; height:40px; padding-top:8px; font-weight:bold;}
.menu span {float:left; color:#4D4959; text-decoration:none; width:130px; height:40px; padding-top:8px}
/* link hover, background pale-blue, text dk-grey */.menu a:hover {color:#FFFFFF; background:#9EBFE2}
.menu {list-style:none; font:16px Arial,Verdana; text-align:center; margin:0 0; padding: 0 0;}
.menu li {position:relative; float:left; width:130px; z-index:100;}
/* drop menu, background darker-green, text smaller */
.menu ul {display:none; position:absolute; font:normal 14px Arial,Verdana; top:36px; left:0; url(images/verd_claret.gif); display:none; list-style:none}
.menu ul li {float:none; width:130px; border-top:0px solid #ccc;}
.menu ul li a, li.menuhover li a, li.menuhover li.menuhover li a {float:none; display:block; background:#d5eeee; height:35px; padding-top:5px; margin: 5px 0px;}
/* drop menu link hover, background pale-blue, text white 21007F */
.menu ul li a:hover, li.menuhover li a:hover, li.menuhover li.menuhover li a:hover {background:#9EBFE2; color:#FFFFFF; }
.menu ul li span, li.menuhover li span, li.menuhover li.menuhover li span {float:none; display:block; background:none; height:22px; padding-top:5px}
.menu ul ul {left:130px; top:0}
.menu li.submenu {font-weight:bold}
.menu li.noborder {border-top:none}
/* drop menu link hover, background pale-blue, text dk-grey */
li.menuhover a, li.menuhover li.menuhover a {color:#4D4959; background:#9EBFE2}
li.menuhover span, li.menuhover li.menuhover span {color:#4D4959; background:#9EBFE2}
/* following added by me for the header – nothing to do with the menu above */
p.title {
color: #4D4959;
background-color: inherit;
font-family: "Trebuchet MS", Verdana, Arial, sans-serif;
font-size: 26px;
font-weight: bold;
padding: 8px;
text-align: center;
}
[/php]
| Ctrl+N | Crea nou document | |
| Ctrl+O | obrir document | |
| Ctrl+W | Tancar document actual | |
| Ctrl+”+” | Ampliar zoom sobre la imagen | |
| Ctrl+”-“ | Disminuir zoom sobre la imagen | |
| Ctrl+0 | Ajustar la imagen al tamaño de la pantalla | |
| Ctrl+Z | Deshacer | |
| Ctrl+Alt+Z | Deshacer paso hacia atrás | |
| Tabulador | Oculta o muestra los paneles (pudiendo dejar así la imagen a pantalla completa) | |
| Ctrl+T | Transformación libre | |
| Ctrl+R | Mostrar u ocultar reglas | |
| Ctrl+Tab | Desplazarse por imágenes abiertas en Photoshop | |
| Alt+May+Ctrl+S | Guardar para web (muy utilizado si tienes un blog) | |
| F2 | Cortar | |
| F3 | Copiar | |
| F4 | Pegar | |
| F12 | Volver | |
| D y C | Cambia entre los colores de fondo y predeterminado |
| H | Herramienta Mano (ideal para mover la imagen cuando hemos aplicado zoom) | |
| B | Herramienta pincel | |
| V | Herramienta puntero | |
| W | Varita mágica | |
| M | Marco rectangular de selección | |
| C | Cortar | |
| E | Borrador | |
| U | Rectángulo | |
| T | Texto | |
| J | Pincel corrector | |
| G | Cubo de pintura | |
| P | Pluma | |
| S | Tampón de clonar | |
| O | Sobreexponer | |
| Z | Zoom |
Para trabajar con Photoshop hay que saber dominar las capas. La importancia de las mismas hace que tengan una gran cantidad de atajos de teclado destinados a su manejo. Estos son algunos:
| Shift+Ctrl+N | Nueva capa | |
| Shift+Ctrl+Alt+N | Nueva capa sin cuadro de diálogo (crea una capa nueva sin mostrarnos el cuadro de diálogo para que le pongamos nombre) | |
| Ctrl+J | Nueva capa vía Copiar | |
| Mayús+Ctrl+J | Nueva capa vía Cortar | |
| Ctrl+Shift+] | La capa seleccionada pasa a la parte superior | |
| Ctrl+Shift+E | Combinar capas visibles | |
| Ctrl+Alt+A | Seleccionar todas las capas | |
| Ctrl+I | Invertir los colores de la capa | |
| Q | Activa la capa rápida | |
| F7 | Mostrar u ocultar ventana de capas |
| Ctrl+B | Equilibrio de color (abre el cuadro de diálogo para modificar los ajustes de color) | |
| Ctrl+U | Tono/Saturación de color | |
| Ctrl+Shift+U | Desaturar color | |
| Ctrl+Alt+I | Cambiar tamaño de la imagen | |
| Ctrl+M | Ajuste de curvas de colores | |
| Ctrl+L | Ajustar niveles de colores | |
| Ctrl+1 | Ampliar al 100% |
Tots els canvis que feu a Firefox, com la pàgina d’inici, les barres d’eines que feu servir, les extensions que heu instal·lat, les contrasenyes desades i les adreces d’interès, es guarden totes en una carpeta especial anomenada perfil (C:\Users\urqte\AppData\Roaming\Mozilla\Firefox). La vostra carpeta de perfils s’emmagatzema en un lloc independent del programa Firefox de manera que, si alguna cosa va malament amb Firefox, la informació encara hi serà. També significa que podeu desinstal·lar Firefox sense perdre la configuració i no heu de tornar a instal·lar Firefox per esborrar la informació o per solucionar un problema.
Es pot consultar -> about:profiles
activa depuració USB
$a = 1;

$b = 2;
function Suma()
{
$GLOBALS[‘b’] = $GLOBALS[‘a’] + $GLOBALS[‘b’];
}
Suma();
echo $b;
This extension was deprecated in PHP 5.5.0, and it was removed in PHP 7.0.0. Instead, the MySQLi or PDO_MySQL extension should be used. See also MySQL: choosing an API guide and related FAQ for more information. Alternatives to this function include: